

Grade 2 Guitar Chords
First up in my Grade 2 Guitar Module – Chords.
Chords are made up of notes in the corresponding scale, a major chord being the first, third and fifth notes in the sequence played together for example. In Grade 2 Guitar, we’re going to build on the chords introduced during the previous Guitar Mastery Modules. This time all the chords are competely new, so make sure to return to previous grades to keep all your guitar knowledge up to scratch!
Performance Notes
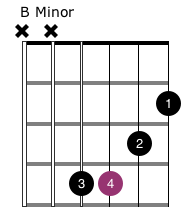
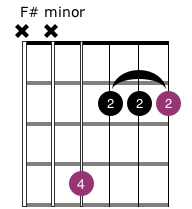
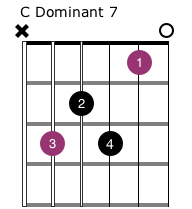
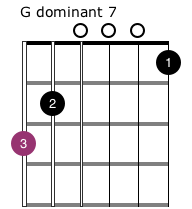
The images that follow show a guitar fretboard as if you’re holding the guitar in front of you, with the nut being the thick black line at the top. An ‘O’ next to a string means play that string ‘open’ (no fingers on frets), an ‘X’ means the chord does not need that string to be played. The black dots direct you to place a fingertip in that location, with the numbers being the suggested finger to use – 1=Index, 2=Middle, 3=Ring, 4=Pinky. The coloured dots are the root notes – in an A chord the A is coloured, in a D chord it would be the note D that is coloured, and so on.
Make sure to alternate downstrokes, where you start strumming at the low E string (the Fat one) or the string closest to it required for the chord, and upstrokes starting with the high E (the Thin one), or the closest to it required for the chord. Doing this doubles your efficiency, and ultimately the speed you can play – not important now, but it will be soon! Use enough pressure to get the notes to sound cleanly, moving your fingertip as close to the fret to the right (for a right-hander) will give you the best chance of a clean chord. You can check out a video of me playing the chords you need for grade 2 here:
Major Chords
A major chord is built from the first, third and fifth notes in the corresponding major scale. You don’t need to know that right now, but it is nice to know the note selections aren’t random! If you need a refresher on the diagrams, click HERE.

Minor Chords (m)
A minor chord is built from the first, flattened-third (the third note, but one fret back from major) and fifth notes in the corresponding major scale.
Dominant Seventh Chords (7)
A dominant seventh chord is built from the first, third, fifth and flattened seventh (the seventh note, but one fret back from major) notes in the corresponding major scale.
Major Seventh Chords (maj7)
A major seventh chord is built from the first, third, fifth and seventh notes in the corresponding major scale.


Minor Seventh Chords (m7)
Grade 2 Guitar introduces the Minor 7th chord. A major seventh chord is built from the first, third, fifth and seventh notes in the corresponding major scale. You will notice the Dmaj7 chord is listed twice – the final example showing the barre technique – using one finger across multiple strings to fret them all at the same time – a useful skill, but it is beyond Grade 1 so something for you to practice for extra credit!
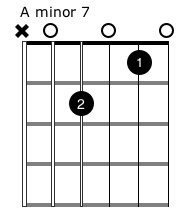
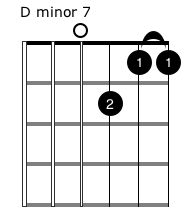
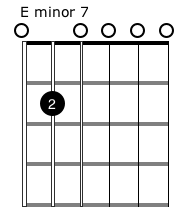
Just like we did in Grade 1 Guitar, make sure you get the shapes under your fingers. Aim to be able to play them on demand and switch confidently between them. With these few extra chords, you’ll extend your repertoire enormously, adding more colour to your sonic palette.
Check out the video to review the material covered in this section, and don’t worry – remembering the shapes and switching between them takes practice. Practice little and often, and you’ll be there before you know it!
Grade 2 Guitar Scales
Next up in my Guitar Mastery Grade 2 Guitar Module – Scales. The scales we want to concentrate on for Grade 2 Guitar are all two-octave. As before, Major and Minor scales have 8 notes, whilst Pentatonics have only five (Penta = Five), but now in Grade 1 Guitar we’re doubling up.
In Grade 2 we’re moving away from the open position scales making up the majority of the material until now. We’re going to be learning some shapes you can move up and down the neck to find different keys, widening your guitar horizons.
Performance Notes
The images that follow, as always, show a guitar fretboard as if you’re holding the guitar in front of you, with the nut being the thick black line at the top. An ‘O’ next to a string means play that string ‘open’ (no fingers on frets), an ‘X’ means the chord does not need that string to be played. The black dots direct you to place a fingertip in that location, with the numbers being the suggested finger to use – 1=Index, 2=Middle, 3=Ring, 4=Pinky. The coloured dots are root notes – in a C major scale, the root note is C, in an A minor scale it is A, and so on.
Make sure to alternate downstrokes, where your pick crosses the string in a downward motion, and upstrokes where your pick crosses the string in an upward motion. Doing this doubles your efficiency, and ultimately the speed you can play – more and more important with each passing grade! Use enough pressure to get the notes to sound cleanly, moving your fingertip as close to the fret to the right (for a right-hander) will give you the best chance of a strong note. Check out the video below to see me playing through the grade 2 scales:
Maintain an even tempo as you play through the scales and across the strings up and down. Refer back to the Reading Notation section if you need a refresher on these diagrams:
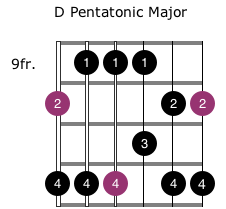
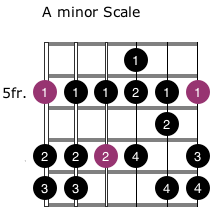
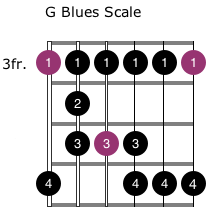
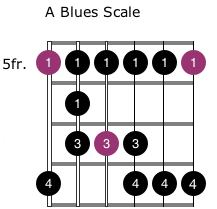
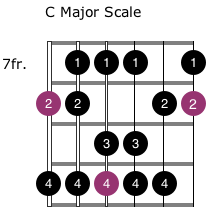
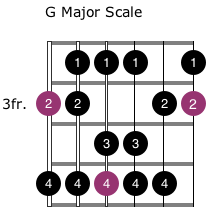
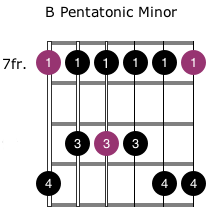
All the scale shapes shown above for Grade 2 Guitar are movable – so if you’re playing lead over chords in the key of A minor you can move the B minor pentatonic shape from the 7th fret to the 5th. If you’re playing in G, start the same pattern at the third fret – and so on.
If you’re playing a G major chord and want to add a few individual notes, the G major scale above is a good place to start. Playing an A minor chord? Go for the A minor or A blues scales above – Simple!
Grade 2 Guitar – Rhythm Playing
We’ve covered some new chords in the Grade 2 Guitar Chords section, adding them to those we learned in Grade 1. Just like before, many of them already work brilliantly together as they exist in the same key, so we can start being musical with them straight away!
Performance Notes
The images that follow show a musical stave, with a single chord written in each bar. Continuing in the same way as the Grade 1 Guitar module, the first three rhythm guitar examples for Grade 2 Guitar are in 4/4 – four beats per bar which means playing 4 downstokes on each chord. The final example is your first in 3/4, three beats per bar which means playing 3 downstokes on each chord. You can find a more detailed explanation of time signatures here. Start slow and work on making sure you get the chord shapes right, hitting all the strings and notes you’re supposed to hit nice and clearly.
Make sure to keep your picking hand movement consistent and alternate downstrokes, where you start strumming at the low E string (the Fat one) or the string closest to it required for the chord, and upstrokes starting with the high E (the Thin one), the the closest to it required for the chord. You do not always have to hit both the downstrokes and upstrokes in full – you might choose to only play part of the chord sometimes, or miss a beat completely. All these variations bring variety in to your rhythm playing. You can check out examples of this in the Videos.
The glossary of musical terms for Grade 2 Guitar is the same as Grade 1:
 forte – play loud
 piano – play softly
 Crescendo, or cres. Gradually getting louder
 Decrescendo, or decresc. Gradually getting quieter
 Repeat section – play everything before this symbol again from the beginning. Second play through continue past the symbol like it isn’t there.
After you can play each chord confidently, practice moving between them using them examples below as your guide, and be sure to pay attention to the performance directions above to make the examples more musical. I’ve recorded an example of each to help you on your way:




You can check out a video of me playing the examples above here:
Once you’ve gotten to grips with the chords for Grade 2 Guitar you can go ahead and create your own sequences from the chords we’ve learned. A bit of trial and error will help here, since picking chords that don’t work so well together is an interesting part of your growth as a musician. You could also start thinking about adding a few notes from the scales we’ve looked at over the top of the chords. As before, a little goes a long way with beginner lead guitar, so let’s try to keep it tasteful people!
Pretty soon you’ll no longer be able to call yourself a beginner guitarist!
Grade 2 Guitar – Developing Lead Guitar
As you all know from the previous grades, playing screaming lead guitar is kinda why I got in to this in the first place. Undoubtedly my favourite aspect of guitar playing and probably the set of skills most likely to make you smile. Also the element of guitar most likely to get you the girl/boy, and the endless adoration of your friends and family. And if not… they’re only jealous!
We’re going to take the techniques we learned in Guitar Grade 1 – namely hammer-ons, pull-offs, bends, vibrato and slides, and continue to work them in to increasingly complicated scales. The good news for us at Grade 2 Guitar is that we’ve learned some new scales, giving us more options while lead playing as well as more colours in our musical palettes. Love it!
Grade 2 Guitar Lead Techniques
We’re going to keep things simple by building on the lead guitar techniques we learned in the previous module. The techniques are exactly the same, but the new scales we’ve introduced make their potential use much more interesting. And by ‘interesting’ we probably mean ‘challenging’.
From Grade 2 onward, we’re placing more emphasis on musicality rather than technique for its own sake, so consider the following:
- Phrasing – Try to find interesting ways of using notes in scales for lead playing, avoiding simply plodding up and down a scale. Vary the tempo, length of notes played and the notes you choose!
- Resolving phrases – You will notice some notes sound better against the underlying chord (Pro tip: root notes are always good, thirds and fifths also reliable). Try to end phrases on one of these notes. If you go wrong, try sliding up or down to find a better sounding note!
- Style – Listen to the backing tracks you’re playing over, and try to make your licks fit the style of the track.
Check out the video of me playing through the exercises here, as well as some ideas for jamming over the backing track:
Exercise 1: Sunshine
OK, so it is possible that I’ve borrowed this idea for a lick from Eric Clapton, and you may notice that this exercise sounds a little bit like the main riff from ‘Sunshine of your Love’ – Total Coincidence! It is also the lower half of an A minor scale with some nice timing and a bit of vibrato. Give it a try!

Exercise 2: Hammer and Pull Multi-String!
In Grade 1 Guitar we learned about hammer-ons and pull-offs, as well as linking them together to Trill. Well, here is another hammer and pull exercise – this time across strings. You might not want to use a whole A minor scale in a real-world playing situation, but the notes of two or three strings could add a nice burst of speed in to your lead playing. And it’s super-easy!
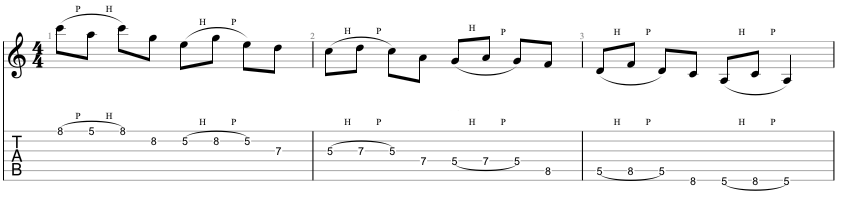
Exercise 3: A Classic with a Twist!
The first bar of this exercise is a bit of a classic – experiment with some nice vibrato on the bends. In bars two and three, try picking all the notes and then experiment with a legato approach for a smoother sound (pull-offs).

Exercise 4: Major scale breakdown with Double-Stops
OK, so this lick has got a little bit of everything. Bar one has a quick trill and a bend, bar two has a fast little run which you can pick or play legato as you prefer. Bar 3 introduces the double-stop, which is nothing more than playing two strings at once for a raunchier sound. try it, double-stops are great for adding variety to your lead lines!

Grade 2 Guitar – Time to Shred!
Armed with the full A minor scale we learned in the scales section, and the tips and tricks above as well as those you picked up from Grade 1 Guitar, have a go playing something epic over the backing track video below. Here is a reminder of the scale – keep in mind you can also use the 7th and 12th fret notes on all strings for some awesome slides!
Can you keep a secret? One that I’m not supposed to tell you for another couple of grades yet? Well, over this same A minor backing track you can also use the notes of the C major scale! ‘Witchcraft’ I hear you cry! Yeah, maybe – but every major key has a relative minor – and the notes of A minor and C major are the same, just played in a different order. So for extra credit, try throwing in some C major as well, maybe even both together!
Tap the image below for an A minor backing track, and leave a link in the comments to let me know how you got on with it – all feedback gratefully received. Check back soon for more lessons to help you grow as a player!
Grade 2 Guitar – Theory
As we reach the conclusion of the beginner zone of guitar mastery, we really need to start appreciating some of the book-learnings. I know how easy it would be to just hit ‘next’ here, but trust me – this stuff really helps you develop as a player… so give me a few minutes of your time. Grade 2 Guitar theory isn’t too in depth, but is a great foundation as you prepare for the intermediate grades.
The Fretboard
You’re about to be an intermediate guitar player, and you’re past the point of putting your fingers where I tell you without knowing what you’re actually playing. It is time to start memorising the first 9-frets of the guitar neck, as shown below. Don’t panic, it isn’t as hard as it looks:
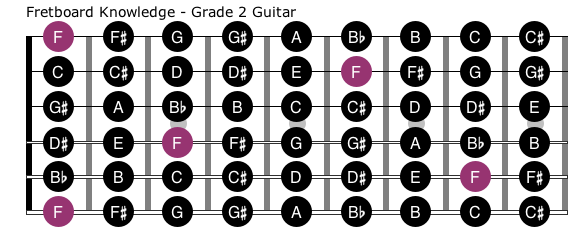
- Start off with the low E string. You have a few jumping off points from the scales we’ve been learning. Try remembering that the 3rd fret is G, 5th is A, 7th is B.
- Notice there is no sharp or flat between B&C and E&F.
- Notice that up two strings and two frets is the same note again? Like the F coloured in purple. Look at the third fret of the A string (a C), then at the 5th fret of the G string (also a C!).
- Notice the note on any fret of the low E string is the same as the note on the same fret of the high E string?
My point being, there are patterns to help you – so if you focus first on the notes of the low E and A rings, the rest will follow.
Efficient Guitar Playing
You might get asked how to play guitar as well as you now do, and you should be able to tell people that the main factors in smooth guitar playing are fretting the note with your fingertip close to the wire to avoid buzz. You will also want to hold the plectrum firmly and use an up/down alternating motion to maximise efficiency.
Knowing your Guitar
Finally for Grade 2 Guitar theory you will want to have memorised the parts of a guitar as we laid out in Guitar Basics, as well as how to tune a guitar effectively.
And that concludes the Guitar Mastery – Grade 2 Guitar Module. Be sure to check back soon for Grade 3!


