

Chords
First up in my Grade 1 Guitar Module – Chords.
Chords are made up of notes in the corresponding scale, a major chord being the first, third and fifth notes in the sequence played together for example. In Grade 1 Guitar, we’re going to build on the first chords introduced during the Total Beginner Guitar Module. Some of the chords are repeated from the previous module.
Performance Notes
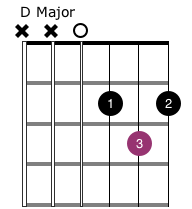
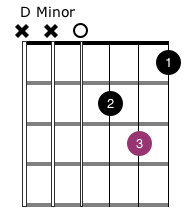
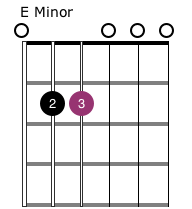
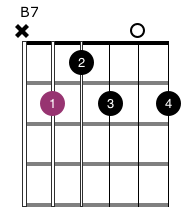
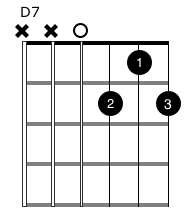
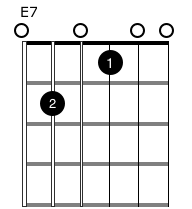
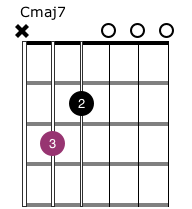
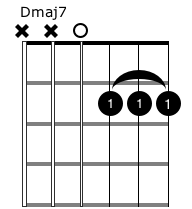
The images that follow show a guitar fretboard as if you’re holding the guitar in front of you, with the nut being the thick black line at the top. An ‘O’ next to a string means play that string ‘open’ (no fingers on frets), an ‘X’ means the chord does not need that string to be played. The black dots direct you to place a fingertip in that location, with the numbers being the suggested finger to use – 1=Index, 2=Middle, 3=Ring, 4=Pinky. The coloured dots are the root notes – in an A chord the A is coloured, in a D chord it would be the note D that is coloured, and so on.
Make sure to alternate downstrokes, where you start strumming at the low E string (the Fat one) or the string closest to it required for the chord, and upstrokes starting with the high E (the Thin one), or the closest to it required for the chord. Doing this doubles your efficiency, and ultimately the speed you can play – not important now, but it will be soon! Use enough pressure to get the notes to sound cleanly, moving your fingertip as close to the fret to the right (for a right-hander) will give you the best chance of a clean chord. You can check out a video of me playing through all the chords here:
Major Chords
A major chord is built from the first, third and fifth notes in the corresponding major scale. You don’t need to know that right now, but it is nice to know the note selections aren’t random! If you need a refresher on the diagrams, click HERE.



Minor Chords
A minor chord is built from the first, flattened-third (the third note, but one fret back from major) and fifth notes in the corresponding major scale.

Dominant Seventh Chords
A dominant seventh chord is built from the first, third, fifth and flattened seventh (the seventh note, but one fret back from major) notes in the corresponding major scale.

Major Seventh Chords
Grade 1 introduces the Major 7th chord. A major seventh chord is built from the first, third, fifth and seventh notes in the corresponding major scale. You will notice the Dmaj7 chord is listed twice – the final example showing the barre technique – using one finger across multiple strings to fret them all at the same time – a useful skill, but it is beyond Grade 1 so something for you to practice for extra credit!


Just like we did in Total Beginner Guitar, make sure you get the shapes under your fingers, are able to play them on demand and can switch confidently between them. With these few extra chords, you’ll extend your repertoire enormously, adding more colour to your sonic palette.
Check out the video to review the material covered in this section, and don’t worry – remembering the shapes and switching between them takes practice. Practice little and often, and you’ll be there before you know it!
Grade 1 Guitar Scales
Next up in my Guitar Mastery Grade 1 Guitar Module – Scales. The scales we want to concentrate on for Grade 1 Guitar are all two-octave. Octave meaning 8, and based on the same ‘Do-Re-Mi-Fa-So-La-Ti-Do’ major scale thinking we covered in the Chords section – just like the Total Beginner Guitar scales we covered previously, but now we extend the scale – repeating it an octave higher. As before, Major and Minor scales have 8 notes, whilst Pentatonics have only five (Penta = Five), but now in Grade 1 Guitar we’re doubling up.
Performance Notes
The images that follow, as always show a guitar fretboard as if you’re holding the guitar in front of you, with the nut being the thick black line at the top. An ‘O’ next to a string means play that string ‘open’ (no fingers on frets), an ‘X’ means the chord does not need that string to be played. The black dots direct you to place a fingertip in that location, with the numbers being the suggested finger to use – 1=Index, 2=Middle, 3=Ring, 4=Pinky. The coloured dots are root notes – in a C major scale, the root note is C, in an A minor scale it is A, and so on.
Make sure to alternate downstrokes, where your pick crosses the string in a downward motion, and upstrokes where your pick crosses the string in an upward motion. Doing this doubles your efficiency, and ultimately the speed you can play – more and more important with each passing grade! Use enough pressure to get the notes to sound cleanly, moving your fingertip as close to the fret to the right (for a right-hander) will give you the best chance of a strong note. You can watch a video of me playing through all the scales you’ll need for Grade 1 here:
Make sure to maintain an even tempo as you play through the scales and across the strings up and down. Refer back to the Reading Notation section if you need a refresher on these diagrams:
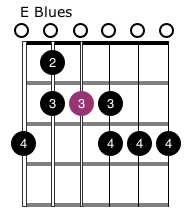
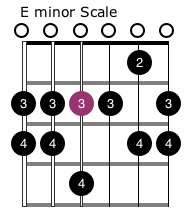
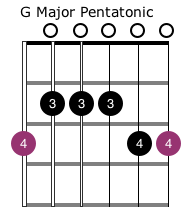
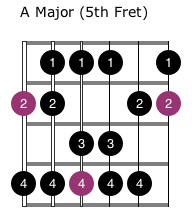
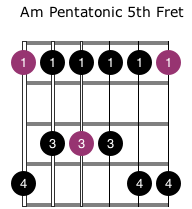
Pay particular attention to the final two scales, both of which start on the 5th fret of the low E string, an A. Both the A major and A minor pentatonic shapes shown above are movable – so if you’re playing lead over chords in the key of A major or A minor you can use the scales above accordingly. If you’re playing in G, start the same pattern at the third fret moving each note down 2 frets to maintain the pattern. For B, move it all up two frets to start on the 7th – and so on.
All the scales shown above work musically with the chords in the previous section. so if you’re playing an A major chord and want to add a few individual notes, the A major scale above is a good place to start. Playing an A minor chord? Go for the A minor pentatonic scale above – Simple!
Grade 1 Guitar – Rhythm Playing
OK, we’ve covered some new chords in the Chords section, adding them to those we learned in the Total Beginner Guitar module. Just like before, many of them already work brilliantly together as they exist in the same key, so we can start being musical with them straight away!
Performance Notes
The images that follow show a musical stave, with a single chord written in each bar. Continuing in the same way as the Total Beginner Guitar module, All the rhythm guitar examples for Grade 1 Guitar are in 4/4 – four beats per bar which essentially means playing 4 downstokes on each chord. You can find a more detailed explanation of time signatures here. Start slow and work on making sure you get the chord shapes right, hitting all the strings and notes you’re supposed to hit nice and clearly.
Make sure to keep your picking hand movement consistent and alternate downstrokes, where you start strumming at the low E string (the Fat one) or the string closest to it required for the chord, and upstrokes starting with the high E (the Thin one), the the closest to it required for the chord. You do not always have to hit both the downstrokes and upstrokes in full – you might choose to only play part of the chord sometimes, or miss a beat completely. All these variations bring variety in to your rhythm playing.
Grade 1 Guitar brings with it some musical terms for performance direction, and helpfully for all of us not fluent in Italian, they’re all Italian! But don’t worry, I’ll translate:
 forte – play loud
 piano – play softly
 Crescendo, or cres. Gradually getting louder
 Decrescendo, or decresc. Gradually getting quieter
 Repeat section – play everything before this symbol again from the beginning. Second pass through continue past the symbol like it isn’t there.
After you can play each chord confidently, practice moving between them using them examples below as your guide, and be sure to pay attention to the musical directions above to make the examples more musical. I’ve recorded an example of each to help you on your way:


Once you’ve gotten to grips with the chords for Grade 1 Guitar you can go ahead and create your own sequences from the chords we’ve learned. A bit of trial and error will help here, since picking chords that don’t work so well together is an interesting part of your growth as a musician. You could also start thinking about adding a few notes from the scales we’ve looked at over the top of the chords. As before, a little goes a long way with beginner lead guitar, so let’s try to keep it tasteful people!
Grade 1 Guitar – Developing Lead Guitar
As we discussed in Total Beginner Guitar, playing screaming lead guitar is kinda why I got in to this in the first place. The first complicated piece of music I ever sat and learned was Eddie Van Halen’s solo in the Michael JacksonTrack Beat It, and if you haven;t heard it… go check it out. You will not be disappointed!
We’re going to take the techniques we learned in Total Beginner Guitar – namely hammer-ons, pull-offs, bends, pre-bends and slides, and continue to work them in to increasingly complicated scales. The good news for us at Grade 1 Guitar is that we’ve learned some scales with more notes in, giving more possibilities for transition between them and more colours in your musical palette. Exciting huh!
Grade 1 Guitar Lead Techniques
We’re going to keep things simple by building on the lead guitar techniques we learned in the previous module. The techniques are the same, but their application is broader. Check out the video to watch me demonstrating the examples below:
Hammer-ons and Pull-offs to Trilling
So we’ve already learned that a hammer-on is playing a note, then without picking the string again tap your finger down on a higher fret and get a second note. A pull-off is playing a higher note, taking your finger off the string to sound a note lower down the neck. Well how about you use both together! Alternating hammers and pulls is calling Trilling, and it’s awesome!

Bending to the next level
In Total Beginner Guitar we learned about string bends, and you’ve probably noticed already how important it is to bend in tune. Well, here is another whole-tone bend exercise – each bend you want to aim to get the note to sound like the one two frets above where you started, maybe even hold it there for a second and let it scream!

Try the examples below, and try bending notes from the examples in the Scales section up one fret or two. Hold, release perhaps even repeatedly. Bends are awesome.

Slide to Vibrato
Last module we looked at slides, which are pretty simple to execute. What we need is a bit more attitude to complete the technique, so here comes a new one – Vibrato. As the word suggests, you’re going to be vibrating the string as you hold a note. Classical players use a very slight movement in the wrist for a subtle vibrato, but that’s not gonna do it on electric guitar. We want a wide or ‘rock’ vibrato. Let’s do it!
You’re going to slide in to a note as shown in the exercise below, and when you land on that note start rhythmically pulling on the string. Make sure to keep it against the fretboard and think of it as a series of small string bends. Experiment with speed, sometimes fast sounds great and sometimes a gentler application fits the mood. Also try very small movements of the string as well as pretty much as wild a movement as you can manage.
Vibrato can be applied to any note any time really, and it is vibrato that makes good guitar players sound like good guitar players. Their playing sounds more assured and accomplished, and yours can too.

I said in Total Beginner Guitar that if you were only going to learn one guitar technique, make it string bending. Well, I think I just changed my mind – if you want your family and friends to notice your progress as a player, work on that vibrato. A good vibrato can completely transform any piece of music!
Grade 1 Guitar – Time to Shred!
Armed with the full A minor pentatonic scale we learned in the scales section, and the tips and tricks above as well as those you picked up from Total Beginner Guitar, have a go playing something epic over the backing track video below. Here is a reminder of the scale – keep in mind you can also use the 7th and 12th fret notes on all strings for some awesome slides!
Click the image below for an A minor backing track, and leave a link in the comments to let me know how you got on with it – all feedback gratefully received. Check back soon for more lessons to help you grow as a player!
And that concludes the Guitar Mastery – Grade 1 Guitar Module. Be sure to check back soon for Grade 2!


